
DIY Crib Skirt: How to Make a Custom Fitted Skirt in 3 Steps
This post contains affiliate links. As an Amazon Associate we earn from qualifying purchases.
To make a crib skirt, you need three fabric panels cut to the exact dimensions of your crib’s mattress support platform, plus the drop height to the floor. The process is measuring, cutting, hemming, and attaching—no complex sewing required. The critical step every store-bought skirt gets wrong is the adjustable attachment, which lets you lower the mattress as your baby grows without buying a new skirt.
That adjustable feature is what turns a weekend project from a temporary fix into a piece that lasts through the toddler years. Most tutorials give you generic measurements. Your crib isn’t generic.
What follows: the three non-negotiable measurements, three build methods ranked by skill level, and the attachment tricks that work on spring bottoms, solid platforms, and everything in between.
Key Takeaways
- Measure your actual crib’s mattress support platform, not the mattress. Crib dimensions vary even within the same model from the same brand.
- For a simple adjustable skirt, cut three separate panels (one for the front, two for the sides) and attach them individually to the platform with clips, pins, or Velcro.
- A ruffled skirt requires 2.5 times the length of your crib side in fabric to create the gathers; using 54-inch wide fabric cuts the yardage needed by nearly half.
- If your crib has a spring base instead of a flat fiberboard platform, thumbtacks won’t work. You need fabric clips, binder clips, or a Velcro strap system.
- A no-sew skirt made with iron-on hem tape and Velcro can be completed in under an hour, is fully washable, and is just as secure as a sewn version.
The Three Measurements Every Tutorial Misses
You don’t measure the crib. You measure the mattress support platform. That’s the flat board or metal grid the mattress sits on. This is the anchor point for any skirt.
The platform’s dimensions are your blueprint. The skirt panels attach here, so their top width must match the platform’s length and width exactly, plus an inch for seam allowance. The height is the vertical drop from the platform’s edge to the floor.
What are the three measurements you need for a crib skirt?
You need the length of the long side of the platform, the length of the short side, and the height from the platform’s edge down to the floor. Write them down in this order: Long Side, Short Side, Height.
Always take these measurements with the mattress removed. Set your mattress support at the highest setting—where it will be for a newborn. This gives you the maximum height, which you can later fold or clip up if you want a shorter skirt, but you can’t add fabric you didn’t cut.
Where “Standard” Crib Sizes Fall Apart
The phrase “standard crib” is a trap. Different distributors source from different factories, and a 28-inch side can easily be 27.5 or 28.5 inches. That half-inch difference is why a store-bought skirt often gaps or pulls.
One parent measured their “standard” crib at 52 inches across the front and 28 inches on the sides. Another with the same model name got 50.5 inches and 27 inches. They are both right. Their cribs are different.
Measure yours. The ten minutes it takes saves the frustration of a too-short panel.
How to Make a Crib Skirt: 3 Methods Compared
Your choice depends on the look you want, your sewing confidence, and your crib’s base type. This table breaks down the decision.
| Method | Best For | Core Skill | Time Estimate | Washable? |
|---|---|---|---|---|
| Simple Adjustable Panels | Beginners, functionality | Measuring & straight seams | 2–3 hours | Yes, panels detach |
| Ruffled Skirt | A traditional, decorative look | Gathering fabric, longer seams | 4–6 hours | Yes, but bulkier to wash |
| No-Sew with Hem Tape | No sewing machine, quick project | Ironing, measuring | 45–60 minutes | Yes, fully |
Method 1: The Simple Adjustable Skirt
This is the most practical approach. You create three separate rectangular panels that attach directly to the mattress platform. When you lower the mattress, you just move the attachment point down.
The Panels:
- Front Panel: Width = Platform Long Side Length + 1 inch. Height = Desired Drop Height + 3 inches.
- Side Panels (x2): Width = Platform Short Side Length + 1 inch. Height = Same as Front Panel.
The extra 3 inches in height is for a 2-inch wrap over the top of the platform plus a 1-inch hem at the bottom. The 1-inch addition to the width is your seam allowance for the side hems.
Common mistake: Cutting one giant U-shaped piece of fabric. It’s harder to handle, doesn’t adjust neatly, and gets caught on crib legs. Three separate panels are simpler.
Assembly:
- Cut your fabric to the calculated dimensions.
- Hem all four sides of each panel. Fold over 1/2 inch, iron, fold another 1/2 inch, iron again, and sew a straight stitch. This encloses the raw edge.
- Create the top attachment flap. Lay the panel flat, wrong side up. Fold the top edge down by 2 inches and iron a sharp crease. This creates a sleeve that slips over the platform.
- Attach to the crib. Slip the 2-inch flap over the edge of the mattress platform. Use small binder clips, quilting clips, or safety pins to secure it at the corners. The weight of the mattress will hold it in place.
This method works with any crib bedding sets fabric you choose, from simple cotton to more decorative patterns. It’s the foundation of a functional, safe crib bedding setup.
Method 2: The Ruffled Crib Skirt
A ruffled skirt uses much more fabric to create a gathered, decorative look. The math is specific.
For a full ruffle, you need a fabric length 2.5 times the length of the crib side you’re covering. A 50-inch long side needs 125 inches of fabric to ruffle down to fit.
Fabric Width is Everything
The amount of fabric you buy is dictated by its width off the bolt. This table shows the dramatic difference.
| Fabric Width | Yardage Needed for 3-Sided Ruffle (50″ L, 27″ S sides) | Why It Matters |
|---|---|---|
| 54 inches | 3 3/4 yards | You can cut the skirt height (27″) from the width, minimizing seams. |
| 44 inches | 7 1/4 yards | The fabric isn’t tall enough, so you must piece panels together, wasting material. |
Where this goes sideways: Buying fabric without checking the width. A 44-inch wide fabric requires nearly double the yardage for the same look. Always check the bolt label.
Construction Overview:
- Cut your fabric strips to the calculated lengths (Side Length x 2.5) and your desired height plus hem allowances.
- Hem the bottom and side edges of each long strip.
- Sew two parallel rows of long basting stitches along the top, raw edge of each strip.
- Gently pull the bobbin threads to gather the fabric evenly until the strip’s length matches your crib side measurement.
- Attach the gathered ruffle to a solid base panel (cut to your platform dimensions) by pinning and then sewing it on.
This method pairs beautifully with soft bamboo crib sheets for a cohesive, luxurious nursery feel.
Method 3: The No-Sew Skirt
No sewing machine? No problem. Iron-on hem tape like Heat N Bond creates durable, washable hems.
The Process:
- Measure and cut your three panels as in Method 1, but add an extra 1.5 inches to all sides for the hem tape fold-over.
- Iron your hem tape between the fabric folds. Follow the product instructions: place the tape, fold the fabric over it, and press with a hot, dry iron. This bonds the fabric layers.
- Attach with Velcro. Stick the hook (rough) side of Velcro strips to the crib’s mattress platform frame. Sew or iron the loop (soft) side to the top back of your fabric panels.
- Press the panels onto the Velcro. The bond is strong enough to hold but allows you to peel the skirt off for washing.
This is a perfect project for a bold print or a special personalized crib sheets coordinate. The whole project can cost less than a yard of fabric and a package of tape.
Attaching the Skirt: What Works (and What Doesn’t)
The attachment must be secure but not permanent. You’ll need to remove it for washing or when you change the mattress height.
For a Flat Fiberboard Platform:
- Binder Clips or Quilting Clips: The simplest. Clip the fabric’s top flap directly to the board. They’re invisible under the mattress.
- Thumbtacks: Push them through the fabric into the board. They work but can leave tiny holes in the fabric.
- Velcro Strips: As described in the no-sew method. Offers the cleanest removable option.
For a Spring Bottom or Metal Grid Platform:
Thumbtacks are useless here. Your best options are: 1. Heavy-Duty Binder Clips: Clip the fabric directly to the metal frame of the spring unit. 2. Fabric Clips with Elastic Loops: Some clips have elastic bands that can be looped around the metal rods. 3. Velcro Straps: Feed a Velcro strap through the springs, around the frame, and back to itself, sandwiching the fabric top.
If your crib has a spring bottom, test your clip-on method before you finish hemming. Make sure the clip grips firmly and doesn’t slip off when you tug the fabric.
The Tools and Fabric You Actually Need
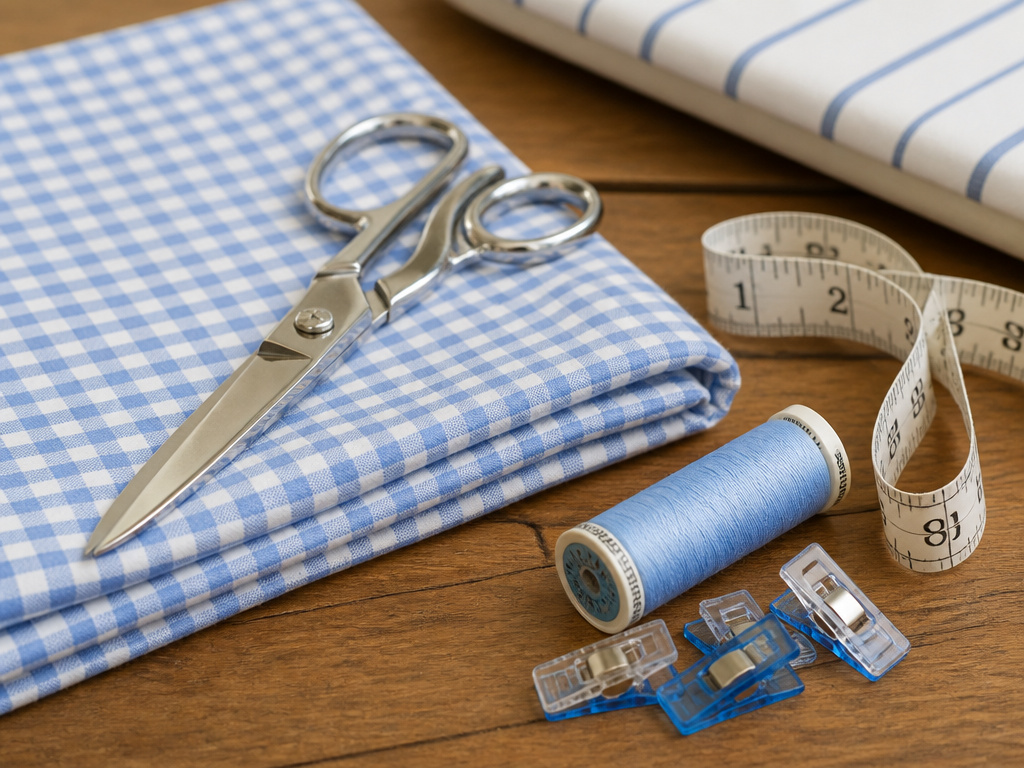 You don’t need a professional sewing room. This list gets it done.
Tools:
- Fabric scissors or a rotary cutter and mat.
- Measuring tape.
- Iron and ironing board.
- Sewing machine OR iron-on hem tape.
- Clips for attachment (binder clips, quilting clips).
- Straight pins.
- Thread that matches your fabric.
Fabric Choice:
Medium-weight cotton, cotton blends, or linen are ideal. They drape well, are easy to sew, and are breathable for the nursery environment. Avoid heavy upholstery fabric (too stiff) or slippery satin (harder to work with).
Your fabric should coordinate with your core crib sheet fabric choices for a pulled-together look. The best materials for baby sheets, like organic cotton, are also excellent for skirts.
Before You Start: The One-Step Safety Check
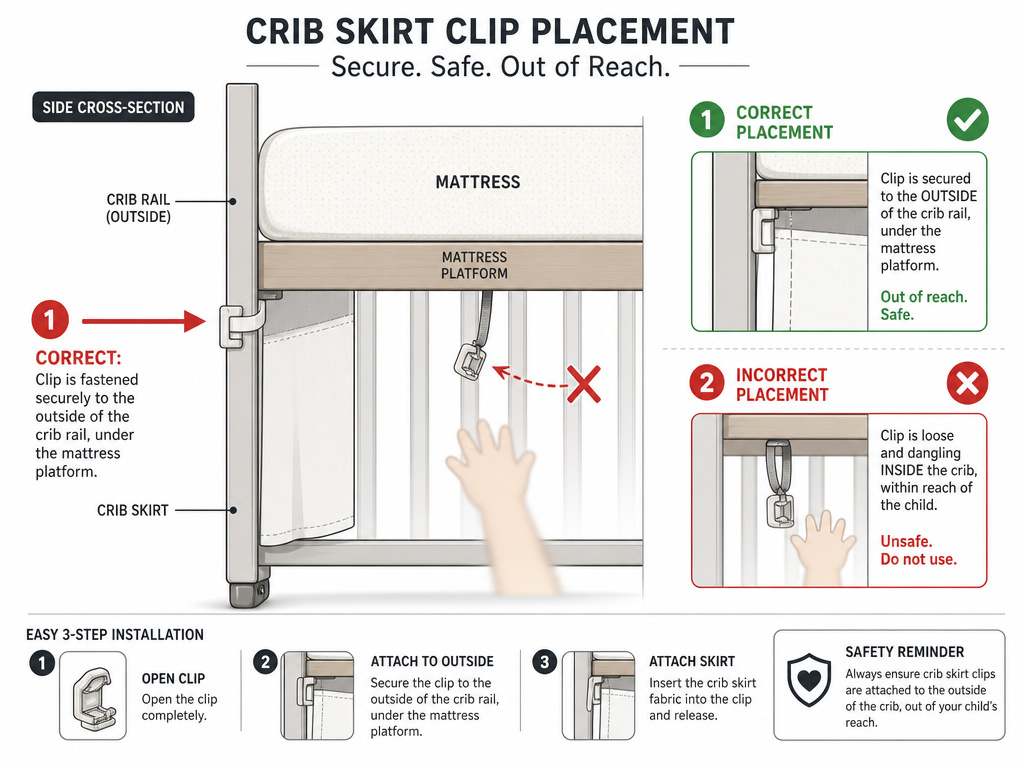
Before you start: Ensure any attachment method (clip, pin, Velcro) is completely secure and cannot be reached or dislodged by a curious toddler once the crib is in use. All fasteners must be on the outside of the crib, under the mattress platform, where little hands cannot possibly access them. A loose clip is a choking hazard.
This is non-negotiable. The mattress weight provides security for now, but as your child grows and becomes more mobile, your attachment must be failsafe from the outside.
Troubleshooting Your Crib Skirt Project
The skirt looks uneven or puckered.
This is usually a tension issue during hemming or gathering. For sewn hems, re-sew with a longer stitch length and don’t pull the fabric as it feeds. For ruffles, gather more slowly and redistribute the fabric along the threads as you go.
The panels are too short after lowering the mattress.
This is why the adjustable flap method is key. If you used it, simply unclip the panels, lower the mattress support, and re-clip the fabric at the new, lower height. The extra fabric will pool slightly on the floor, which you can trim or leave for a puddled look.
I have a mini-crib. Does this change anything?
Only the measurements. The principles are identical. You’ll just be working with smaller panels. The same advice for finding the right mini crib sheets applies—precision in measuring is even more critical with smaller dimensions.
Frequently Asked Questions
Can I use a fitted sheet to make a crib skirt?
Yes, it’s a clever hack. A fitted crib sheet provides a large, pre-hemmed piece of fabric. You cut off the elasticated corners and then treat the remaining flat sheet as your fabric yardage for one of the methods above. It guarantees a perfect color match to your existing fitted sheets.
How much fabric do I need for a non-ruffled crib skirt?
For a simple three-panel skirt, you typically need 1.5 to 2 yards of 54-inch wide fabric. The exact amount depends on your crib’s specific dimensions and the drop height. Always calculate your panel sizes first, then map them out on the fabric width to determine yardage.
Is a crib skirt safe?
Yes, when made and attached correctly. The skirt must be secured tightly to the mattress support platform so it cannot be pulled loose by little hands. There should be no loose ribbons, ties, or long strings hanging into the crib. The skirt itself should be outside the crib, purely decorative.
Do I need a crib skirt?
Functionally, no. A crib mattress does not require one. Aesthetically, many parents like them to hide under-crib storage, complete a nursery theme, or soften the look of the crib’s legs. It’s a decorative choice.
Can I make a crib skirt without any sewing?
Absolutely. The no-sew method using iron-on hem tape and Velcro is durable, washable, and can be completed in an afternoon. It’s an excellent option for renters or anyone who wants a completely removable skirt without altering the crib.
The Bottom Line
Making a crib skirt is about customizing a solution for your specific furniture. Ditch the generic store sizes. Measure your platform, add an inch, cut three panels, and choose an attachment method that matches your crib’s base. The simple adjustable panel method is the most forgiving and lasts the longest. Whether you sew it or iron it, the result is a tailored finish that a mass-produced skirt can’t match. And it will fit.
