
DIY Crib Bed Skirt Guide: Adjustable Method for Any Crib
This post contains affiliate links. As an Amazon Associate we earn from qualifying purchases.
To make a crib bed skirt, you need three measurements: the length of the crib’s mattress support platform, the width, and the drop height from that platform to the floor. Cut three fabric panels (one long front, two short sides) using those numbers plus seam allowance, hem them, and attach them to the platform with a non-permanent method like thumbtacks, clips, or Velcro for easy adjustment as the mattress lowers.
The measurements are the only fixed part. The attachment method is where the real decision lives, and it depends entirely on your crib’s construction, specifically, whether the bottom is a solid board or a set of metal springs. Get that wrong, and your skirt sags or falls off the first time you adjust the mattress height.
What follows: the exact panel dimensions from three different tutorials, a head-to-head on sewing versus no-sew, and the fix for the spring-bottom crib that most guides ignore.
Key Takeaways
- The front panel is typically 52.5 inches long; side panels are about 28.5 inches. Always add 4 inches to both length and height for seams and hemming.
- Use thumbtacks or binder clips for a solid wood platform. For a crib with a spring-metal bottom, you must use fabric ties or paper clip clamps, thumbtacks won’t work.
- A no-sew skirt made with fabric tape and Velcro strips takes about two hours and lets you reposition panels as the mattress lowers.
- If you want a ruffled look, you need 2.5 times the length of the crib side in fabric. A standard 50-inch side needs 125 inches of material to gather.
- The weight of the crib mattress itself is enough to hold a simple draped skirt in place, requiring no tools or fasteners at all.
The Three Measurements You Need (Before You Cut)
Every tutorial starts with a tape measure, but they all converge on the same three numbers. You are measuring the crib’s mattress support platform, the solid piece or metal frame the mattress sits on, not the crib’s outer dimensions.
The Three Measurements: 1) Length of the long front side of the platform. 2) Width (or length) of the two short sides. 3) Vertical drop from the top of the platform to the floor.
For a standard full-size crib, the platform is usually about 52.5 inches long by 28.5 inches wide. The drop height is the variable. Measure this with the mattress support at its highest setting (the newborn position). A typical drop is between 20 and 24 inches.
Add four inches to both the length and height of each panel. This gives you a 2-inch seam allowance on the top and bottom for a clean hem. Cutting exactly to the measured size leaves no room for error and creates a skirt that is perpetually too tight.
| Panel Type | Platform Measurement | Fabric Cut Size (with 4″ added) | Purpose of the Extra |
|---|---|---|---|
| Front Panel | 52.5″ L x [Your Drop]” H | 56.5″ L x [Drop+4]” H | 2″ top seam, 2″ bottom hem |
| Side Panel | 28.5″ L x [Your Drop]” H | 32.5″ L x [Drop+4]” H | 2″ top seam, 2″ bottom hem |
Where this goes sideways: assuming all crib platforms are solid. If your crib has a spring-metal bottom, a grid of metal rods instead of a flat board, thumbtacks are useless. You’ll need to sew fabric ties or use metal paper clip clamps to attach the panels to the springs. Check this before you choose an attachment method.
Method 1: The Classic Sewn Skirt
This is the permanent-craft approach. You’ll need a sewing machine, thread, fabric, and an iron. The goal is three finished, hemmed rectangles you can attach securely.
First, cut your panels using the calculated sizes from the table above. Use a rotary cutter and mat for straight lines, or carefully rip the fabric along the grain if you’re using a woven material like cotton or linen, it creates a perfectly straight edge.
Hem all four sides of each panel. Fold over 1/2 inch, press with an iron, fold over another 1/2 inch, press again, and stitch. This double-fold hem prevents fraying and looks professional. The top edge of the panel is where you’ll create a sleeve or attachment point.
For a simple adjustable skirt, create a 1-inch deep sleeve along the top edge. Fold the top over 1 inch, press, and stitch close to the folded edge. This creates a tunnel. You can then thread a piece of grosgrain ribbon through it to tie the panel to the crib spindles, or use it to slide the panel onto the platform before securing the mattress.
Common mistake: Sewing the panels directly to a crib sheet or decking without planning for the mattress bracket holes. The metal brackets that hold the mattress platform must poke through. If you’re attaching panels to a sheet base, trace the bracket locations and leave open gaps in your stitching.
The sewn method gives the cleanest finish and is durable through multiple adjustments. It’s the right choice if you own a machine and plan to use a delicate or patterned fabric you love.
Method 2: The No-Sew Adjustable Panels
No sewing machine? The no-sew method uses fabric tape and Velcro strips to create individual panels that stick to the metal mattress platform. It takes about two hours.
Your material list is short: 1.5 to 2 yards of fabric, sharp scissors, a measuring tape, PeelnStick Fabric Tape, and 3M Velcro Hanging Strips. Medium-weight fabric like canvas or decorator cotton works best; flimsy fabric won’t hold the tape’s bond.
Cut your panels to the finished size you want (platform measurement plus desired drop). There’s no seam allowance needed because you won’t be sewing. Instead, use the fabric tape to create hems.
Apply the double-sided fabric tape to the back of the fabric’s raw edge. Peel the backing, fold the fabric over to encase the tape, and press firmly. The bond sets instantly. Do this for all four sides of each panel. It creates a clean, fray-free edge without a single stitch.
Where this goes sideways: Using the wrong side of the Velcro. The hook side (the rough side) goes on the crib’s metal platform. The loop side (the soft side) gets sewn or taped to the top back of your fabric panel. Mixing them up means the panel won’t stick securely.
Attach the hook strips to the metal platform where you want the panel to hang. Press the panel’s loop side onto the hooks. The beauty here is repositioning. When you lower the mattress, just peel the panel off and restick it higher on the platform. The panel stays perfectly vertical and neat.
Head-to-Head: Sewn vs. No-Sew Crib Skirts
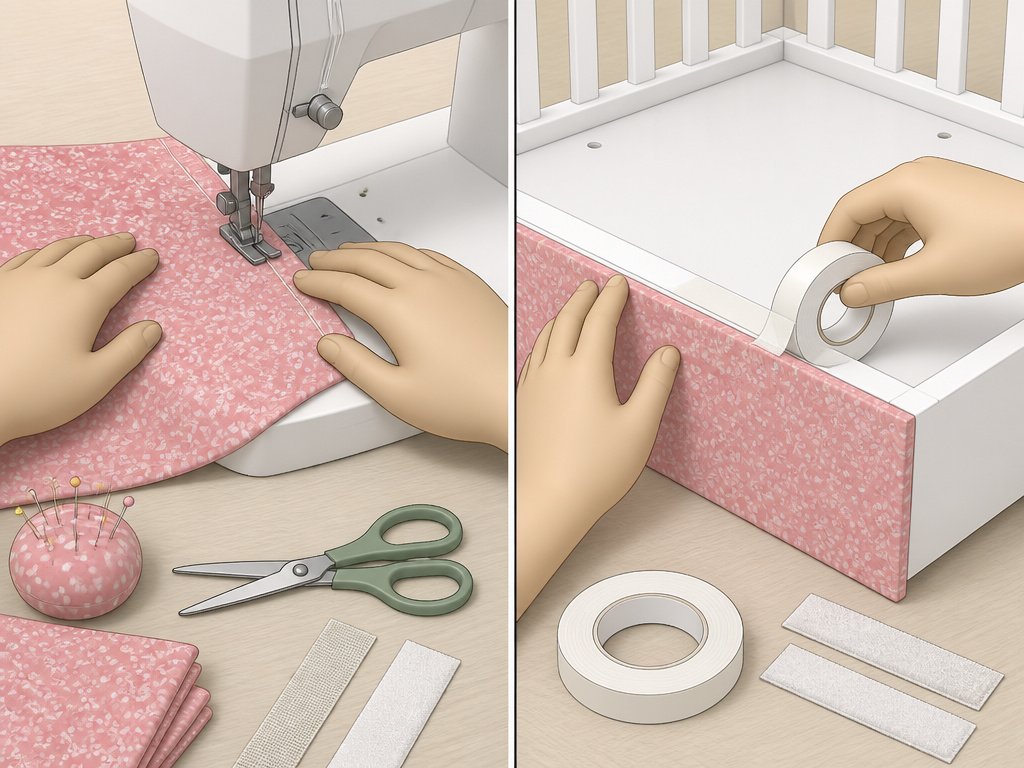
Which method wins? It depends on your crib, your tools, and how long you want the skirt to last.
| Aspect | Sewn Skirt | No-Sew Skirt |
|---|---|---|
| Time Investment | 3–4 hours (cutting, pinning, sewing, pressing) | 1.5–2 hours (cutting, taping, sticking) |
| Durability | High. Washer-safe if using cotton. | Medium. Velcro adhesive may weaken after 5–6 repositions. |
| Adjustability | Good. Requires untying or unclipping. | Excellent. Peel and restick in seconds. |
| Best For | Heirloom fabric, ruffled designs, spring-bottom cribs. | Rental homes, temporary nurseries, quick updates. |
| Cost | Fabric + thread. | Fabric + tape + Velcro strips. |
The sewn skirt is a piece of nursery bedding. The no-sew skirt is a decor accessory. If you envision this skirt being used for future children or stored as a keepsake, sew it. If you just want to hide the under-crib storage area for a year, the no-sew method is faster and perfectly effective.
How to Handle a Crib with a Spring Bottom
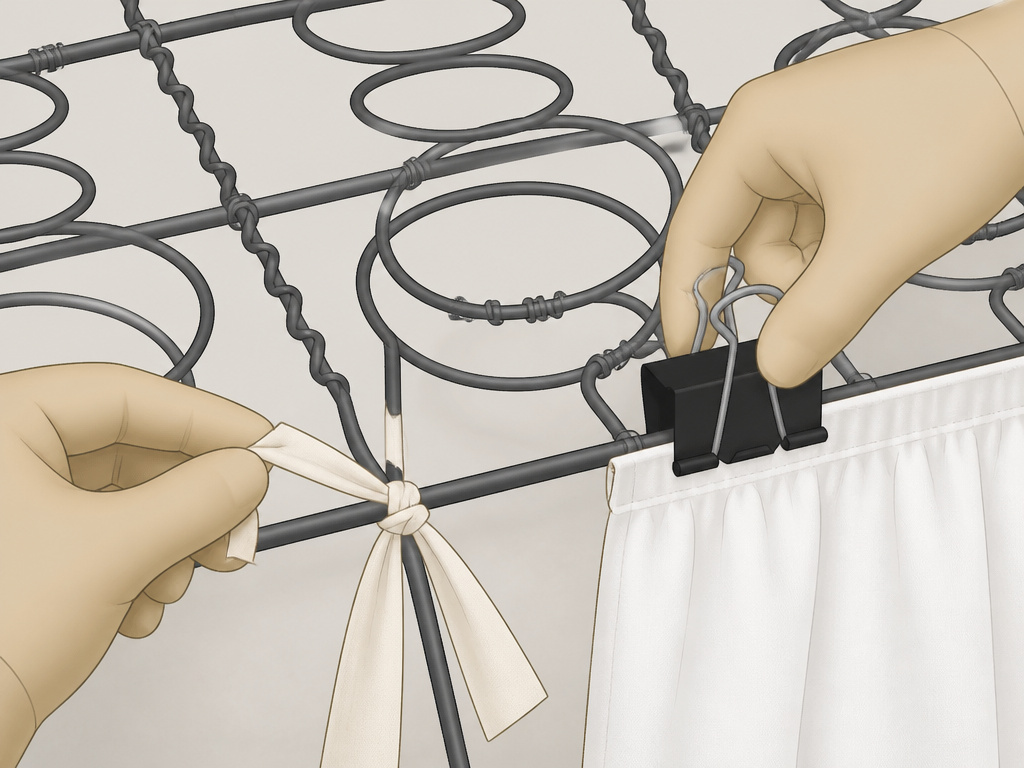
This is the edge case most tutorials gloss over. Many older or convertible cribs have a mattress platform made of interlocking metal springs, not a solid board. You can’t push a thumbtack into thin air.
Your attachment options change completely. You have two paths: fabric ties or mechanical clamps.
Fabric Ties: Sew 12-inch long fabric strips (or use grosgrain ribbon) to the top corners of each panel. Once the panel is positioned, tie these strips securely around the metal springs. This method is secure and fully adjustable, but it requires sewing the ties on.
Paper Clip Clamps: Use large, sturdy metal binder clips or even actual black office paper clips. Clip the top hem of the fabric panel directly onto the spring wire. This is a brilliant, tool-free hack. It holds surprisingly well and lets you move the panel up or down by simply unclipping and reclipping.
If your crib has a spring bottom, skip thumbtacks and Velcro. The spring wires are too narrow for Velcro to grip reliably, and thumbtacks have nothing to bite into. Ties or clips are the only reliable fix.
The panel dimensions don’t change. Just the way you get them to stay put.
The Simple Draped Skirt (The 10-Minute Option)
What if you don’t want to measure, cut, or attach anything? The draped skirt uses the weight of the crib mattress as its only fastener.
Take a long, wide piece of fabric, about 4 to 5 yards for a standard crib. A textured fabric like burlap or a heavy linen drapes best. Drape the fabric across the mattress support platform so it hangs evenly over the front and sides. There’s no cutting or hemming.
Then, place the crib mattress on top. The mattress’s weight pins the fabric in place. To adjust, simply lift the mattress, reposition the fabric, and set the mattress back down.
It’s not a skirt in the traditional sense. It’s a draped valance. The look is softer, more organic, and it’s impossible to mess up. The downside is that the sides may not hang perfectly straight, and lightweight fabrics can slip out over time.
TL;DR: For a spring-bottom crib, use ties or clips. For a solid platform, thumbtacks or Velcro work. For zero commitment, just drape and let the mattress do the holding.
Frequently Asked Questions
What are the standard crib skirt dimensions?
For a full-size crib, the mattress platform is typically 52.5 inches long by 28.5 inches wide. The front panel is cut to that length, and the two side panels are cut to the width. The height (or drop) varies by crib model but is usually between 20 and 24 inches from the platform to the floor at the highest mattress setting.
How much fabric do I need for a crib bed skirt?
For a simple three-panel skirt with a 22-inch drop, you’ll need about 2.5 yards of 54-inch wide fabric. If you want a ruffled skirt, you need 2.5 times the length of each side in fabric. For a 52.5-inch front, that’s about 130 inches (or 3.6 yards) for that panel alone. Always buy an extra half-yard for mistakes.
Can I make a crib skirt without sewing?
Yes. Use fabric tape to create hems and 3M Velcro strips to attach the panels to the metal mattress platform. This creates a fully adjustable, no-sew skirt in about two hours. Another no-sew option is the draped method, where you simply lay a long piece of fabric across the platform and secure it with the weight of the mattress.
How do I attach a crib skirt to a spring bottom crib?
You cannot use thumbtacks or adhesive Velcro on a spring grid. Instead, sew fabric ties or ribbons to the top corners of each panel and tie them securely to the springs. Alternatively, use large metal binder clips to clip the fabric directly onto the spring wires for a tool-free, adjustable hold.
Is a crib skirt safe?
Yes, a crib skirt is safe when installed correctly. It must be securely attached to the mattress platform or springs so it cannot come loose and pose a entanglement or suffocation risk. Ensure there is no loose fabric inside the crib where the baby could reach it. The skirt should only decorate the outside perimeter, well away from the sleeping infant.
The Bottom Line
Making a crib skirt comes down to matching your method to your crib’s hardware. Measure the platform, add four inches, and cut three panels. For a solid board, thumbtacks are simple. For springs, you need ties or clips. If you hate tools, drape a long fabric and let the mattress hold it.
The goal isn’t a perfect hem. It’s a skirt that adjusts as your baby grows, hides the clutter underneath, and comes down without a fight when the crib converts to a toddler bed. That’s the part that actually matters.
