
How to Put a Crib Skirt on a Crib | Quick Installation Tips
This post contains affiliate links. As an Amazon Associate we earn from qualifying purchases.
To put a crib skirt on a crib, attach individual fabric panels directly to the crib’s mattress support using thumbtacks, velcro, or clips. This adjustable method works for any crib type, accommodates changing mattress heights, and requires no permanent sewing or modification.
The catch is your crib’s bottom. A flat fiberboard bottom takes thumbtacks. A spring bottom needs fabric ties or velcro strips. The method changes, but the principle is the same: you’re hanging panels from the support the mattress sits on, not from the crib frame.
What follows: how to measure for three common crib types, the two attachment methods that work, and the step-by-step for adjustable panels that move when you lower the mattress. This is the method that solves the problem of a skirt that’s too short in six months.
Key Takeaways
- Use an adjustable panel system, not a sewn skirt. Individual panels attached to the mattress support let you reposition them as the mattress lowers.
- Match your attachment to the crib bottom. Flat fiberboard accepts thumbtacks; a spring bottom requires velcro strips or fabric ties looped around the springs.
- Measure the mattress support, not the crib frame. Your panel’s width is the length of that metal or wood rail; the height is the distance from the rail to the floor.
- Add four inches to your panel dimensions. This accounts for a finished hem and the fabric you’ll tuck or wrap over the support rail.
- For cribs with hardware brackets, you must unscrew the bracket, thread the skirt’s sleeve or panel over it, and reattach. Pinning fabric around a bracket never holds.
Why a Traditional Crib Skirt Fails Most Cribs
A traditional, sewn crib skirt is a single piece with a deck that sits under the mattress and three attached drop-down panels. It assumes a static, unchanging environment. Your crib is not static. The mattress starts high for a newborn and gets lowered, often twice, as the child grows. A fixed skirt that perfectly skimmed the floor at the highest setting will hang mid-air at the lowest.
Where this goes sideways: Using a sewn skirt on a crib with an adjustable mattress height. By the first lowering, the skirt panels no longer touch the floor, leaving the under-crib storage exposed and looking unfinished.
The adjustable panel method fixes this. You create three separate panels—front, left, right—and attach each directly to the crib’s mattress support platform. When you lower the mattress, you detach the panels and re-pin or re-stick them lower on the same support. The skirt always reaches the floor. This method is detailed in a 2015 patent for a crib liner with an integrated skirt, which describes a skirt portion attached to a liner along the mattress platform’s edge.
This approach also handles the two most common crib bottom types: solid fiberboard and spring grids. Your attachment tool changes, but the hanging point does not.
The Two Attachment Methods That Actually Work
Your crib’s mattress support dictates the attachment. Get this wrong, and the panels sag, detach, or damage the crib.
| Crib Bottom Type | Best Attachment | Why It Works | Risk If You Use the Wrong Method |
|---|---|---|---|
| Flat Fiberboard | Flat-topped thumbtacks or map pins. | The tack pushes easily into the pressed wood and grips firmly. The flat head holds fabric without tearing. | Spring-bottom clips or velcro won’t grip a solid surface; the panel falls off. |
| Spring Grid | 3M Velcro strips (hook side on crib, loop side on panel) or fabric ties. | Velcro adhesive bonds to the metal spring. Fabric ties loop around individual springs. | Thumbtacks cannot pierce metal springs and will bend or snap, leaving the panel unattached. |
A crib mattress support made of interlocking metal springs cannot be pierced with a thumbtack. The metal is hardened, and the tack will bend before it punctures, leaving you with a broken pin and fabric that won’t stay up.
For a spring bottom, velcro strips are the cleanest solution. Stick the hook (rough) side of the strip directly onto a horizontal spring rail. Sew or use fabric tape to attach the loop (soft) side to the top back of your fabric panel. Press together. It holds securely, survives mattress adjustments, and removes without residue.
If your crib has side brackets that secure the mattress support to the crib frame, you have an extra step. You cannot simply pin fabric around them. The bracket must be unscrewed, the fabric panel threaded onto it, and the bracket re-tightened. Some DIY tutorials use a fabric sleeve on the panel for this purpose. Skipping this step means the panel bunches awkwardly around the hardware and never hangs straight.
The Step-by-Step Guide for Adjustable Panels
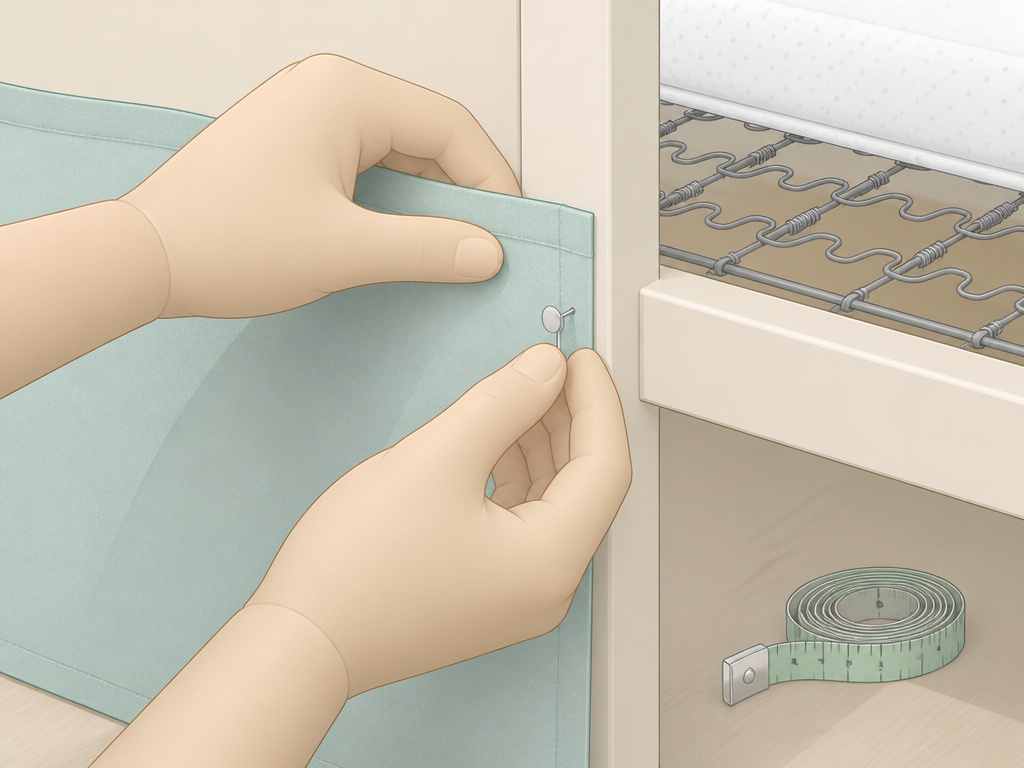
This process uses separate panels attached with your chosen method (thumbtacks or velcro). It works for any standard crib and requires only fabric, scissors, a measuring tape, and your attachment tools.
Tools & Materials You’ll Need
- 1.5 to 3 yards of fabric (depends on crib size and panel fullness)
- Sharp fabric scissors
- Measuring tape
- Iron and ironing board (for crisp hems)
- Attachment Kit (choose one):
- For fiberboard bottoms: Pack of flat-topped thumbtacks.
- For spring bottoms: 3M Velcro Strips (or sticky-back velcro squares) and heavy-duty fabric adhesive if not sewing.
- Optional: Fusible hem tape (like HeatnBond) for a no-sew finish.
Step 1: Measure Your Crib’s Mattress Support
Set the crib mattress to its highest position. This is where you’ll install the skirt initially.
You need two measurements for each side (front, left, right): 1. Panel Width: Measure the length of the mattress support rail for that side. For the front, this is the long rail. Do not measure the crib’s exterior frame. 2. Panel Height: Measure from the top of the mattress support rail down to the floor.
Write these down. If one side is against a wall, you may only need two panels.
Common mistake: Measuring the crib’s exterior frame. The skirt hangs from the mattress platform, which is always set inward from the crib’s edges. A panel cut to the crib’s outside width will be too long and bunch on the floor.
Step 2: Cut and Finish Your Fabric Panels
Add four inches to both the width and height measurements. The extra four inches gives you two inches for a double-fold hem on all sides and ensures full coverage.
For example, if your front support rail measures 52 inches wide and the drop to the floor is 12 inches: – Cut panel width: 52″ + 4″ = 56″ – Cut panel height: 12″ + 4″ = 16″
Finish all four edges of each panel. You can sew a simple double-fold hem or use fusible hem tape. An ironed hem is non-negotiable—it prevents fraying and gives a polished look. For a no-sew skirt, iron-on hem tape is a legitimate, durable choice.
Step 3: Attach the Panels to the Mattress Support
This is where your chosen attachment method comes into play.
For Thumbtack (Fiberboard) Installation:
- Drape the finished panel over the mattress support rail, centering it.
- Let the panel hang down. Adjust it so the bottom just barely skims the floor.
- At the top back of the panel, fold about two inches of fabric over the top of the support rail.
- Secure this folded-over flap to the vertical side of the fiberboard support with 3-4 thumbtacks. Do not tack into the top surface where the mattress sits.
- Space tacks evenly along the width. The weight of the mattress will hold the front of the panel in place.
For Velcro (Spring Bottom) Installation:
- Cut velcro strips into 2-inch pieces. You’ll need 4-5 pieces per panel.
- Adhere the hook (rough) strips directly onto a horizontal bar of the spring grid, spaced evenly along where the panel will hang.
- Adhere or sew the loop (soft) strips to the top back of your fabric panel, aligning with the hooks on the crib.
- Press the panel onto the springs, connecting the velcro. The panel should hang straight and touch the floor.
The part nobody mentions: On a spring bottom, always attach velcro to a horizontal spring, not a vertical one. The horizontal bar provides a flat, stable surface for the adhesive. A vertical spring flexes too much and the bond will fail.
What to Do When Your Crib Throws a Curveball
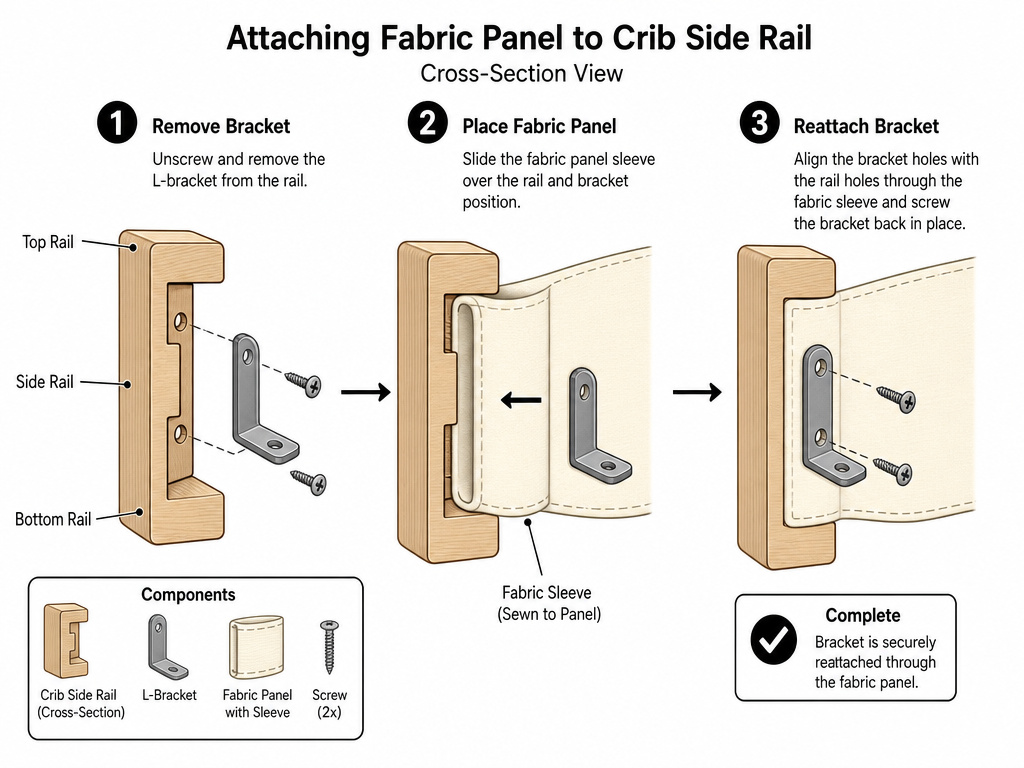
Not all cribs are standard rectangles with simple bottoms. Here’s how to handle the exceptions.
Cribs with Hardware Brackets:
Many cribs use L-shaped metal brackets to bolt the mattress support to the side rails. You can’t pin fabric over them. 1. Unscrew the bracket from the side rail. 2. If your panel has a fabric sleeve (a sewn tube at the top), thread the bracket through it. 3. If it doesn’t, simply place the panel over the bracket. 4. Re-attach the bracket through the fabric, tightening the screw firmly. The fabric is now sandwiched securely between the bracket and the rail.
Adjusting the Skirt When You Lower the Mattress:
This is the entire point of the panel method. 1. Remove the mattress. 2. For thumbtacked panels: Pull out the tacks, lower the panel to the new desired height (still skimming the floor), and re-tack. 3. For velcro panels: Peel the panel off, reposition the hook strips lower on the spring grid, and re-attach the panel. The process takes five minutes per side. A sewn skirt cannot do this.
Skip this if: You’re using a heavy, bulky fabric like burlap or thick upholstery material. These are too stiff to drape nicely from a mattress support and are better suited for a traditional deck-style skirt. For panels, choose medium-weight cotton, linen, or a cotton-polyester blend.
Frequently Asked Questions
Can you use safety pins instead of thumbtacks?
You can, but they are less secure. Safety pins can slip through woven fabric or pop open under the slight tension of a hanging panel. Thumbtacks bite into the fiberboard and won’t let go. If you must use pins, opt for sturdy quilt pins or diaper pins, and check them weekly.
How do you put a crib skirt on a crib with drawers underneath?
The process is identical. Measure from the mattress support down to the top of the drawer front, not to the floor. Your skirt panel will be shorter, designed to hide the gap above the drawer. The attachment method is still to the mattress support.
What’s the best fabric for a DIY crib skirt?
Choose a washable, medium-weight woven fabric like quilting cotton, cotton-linen blend, or a sturdy flannel. These crib sheet materials are breathable, durable, and easy to work with. Avoid stretchy knits or slippery satins, as they are difficult to hem and won’t hang cleanly.
Is a no-sew crib skirt safe?
Yes, if you use the right materials. Iron-on hem tape (fusible web) creates a bond that is often stronger than a stitch and won’t come undone in the wash. Ensure any adhesive velcro is firmly attached so small fingers can’t pry it loose. The skirt itself is not in the sleep space, so it poses no entanglement risk.
How much fabric do I need for a three-panel crib skirt?
For a standard crib, budget 2 to 2.5 yards of 54-inch-wide fabric. This allows you to cut three panels from the width of the fabric, minimizing seams. Always buy a little extra—an extra quarter yard is cheap insurance against a measuring mistake.
Before You Go
Putting on a crib skirt is about matching the method to your crib’s mechanics. Ditch the one-piece skirt. Make three separate panels and attach them directly to the mattress support with thumbtacks for fiberboard or velcro for springs. This gives you a custom look that adapts in two minutes when you lower the mattress.
Your fabric choice matters too. A soft, breathable cotton is easier to work with and coordinates with your crib bedding better than a stiff alternative. The goal is a finished nursery that works as hard as you do. This method gets you there.
